FichteHiro (talk | contribs) (→Trivia) |
DocOctober (talk | contribs) m (Reverted edits by ClifffW (talk) to last revision by FichteHiro) Tag: Rollback |
||
| (22 intermediate revisions by 4 users not shown) | |||
| Line 11: | Line 11: | ||
Trial locations have certain fixed landmarks, but elements such as player starting locations, {{IconLink|Generators}}, {{IconLink|Chests}} {{IconLink|Lockers}}, {{IconLink|Totems}} and {{IconLink|Exit Gates}} are placed to The Entity's whims. Even the terrain itself shifts from trial to trial. |
Trial locations have certain fixed landmarks, but elements such as player starting locations, {{IconLink|Generators}}, {{IconLink|Chests}} {{IconLink|Lockers}}, {{IconLink|Totems}} and {{IconLink|Exit Gates}} are placed to The Entity's whims. Even the terrain itself shifts from trial to trial. |
||
| − | There are currently '''{{clr|2|{{ |
+ | There are currently '''{{clr|2|{{#Invoke:Maps|getCountOfRealms}}}}''' Realms and '''{{clr|6|{{#Invoke:Maps|getCountOfMaps}}}}''' Maps featured in ''{{IconLink|Dead by Daylight}}''. |
| − | |||
== Lore == |
== Lore == |
||
| Line 19: | Line 18: | ||
== Realms & Maps == |
== Realms & Maps == |
||
| − | === [[MacMillan Estate]] === |
+ | === [[The MacMillan Estate]] === |
| + | {{#Invoke:Maps|assembleMapsForRealms|The MacMillan Estate}} |
||
| − | {| class="wikitable" |
||
| − | |<center>[[Coal Tower]]</center> |
||
| − | [[File:IconMap Ind CoalTower.png|center|frameless|link=Coal Tower]][[File:CoalTowerOutline.png|center|frameless|200px|link=Coal Tower]] |
||
| − | |<center>[[Groaning Storehouse]]</center> |
||
| − | [[File:IconMap Ind Storehouse.png|center|frameless|link=Groaning Storehouse]][[File:GroaningStorehouseOutline.png|center|frameless|200px|link=Groaning Storehouse]] |
||
| − | |<center>[[Ironworks of Misery]]</center> |
||
| − | [[File:IconMap Ind Foundry.png|center|frameless|link=Ironworks of Misery]][[File:IronworksOfMiseryOutline.png|center|frameless|200px|link=Ironworks of Misery]] |
||
| − | |<center>[[Shelter Woods]]</center> |
||
| − | [[File:IconMap Ind Forest.png|center|frameless|link=Shelter Woods]][[File:ShelterWoodsOutline.png|center|frameless|200px|link=Shelter Woods]] |
||
| − | |<center>[[Suffocation Pit]]</center> |
||
| − | [[File:IconMap Ind Mine.png|center|frameless|link=Suffocation Pit]][[File:SuffocationPitOutline.png|center|frameless|200px|link=Suffocation Pit]] |
||
| − | |} |
||
=== [[Autohaven Wreckers]] === |
=== [[Autohaven Wreckers]] === |
||
| + | {{#Invoke:Maps|assembleMapsForRealms|Autohaven Wreckers}} |
||
| − | {| class="wikitable" |
||
| − | |<center>[[Azarov's Resting Place]]</center> |
||
| − | [[File:IconMap Jnk Office.png|center|frameless|link=Azarov's Resting Place]][[File:AzarovsRestingPlaceOutline.png|center|frameless|200px|link=Azarov's Resting Place]] |
||
| − | |<center>[[Blood Lodge]]</center> |
||
| − | [[File:IconMap Jnk Lodge.png|center|frameless|link=Blood Lodge]][[File:BloodLodgeOutline.png|center|frameless|200px|link=Blood Lodge]] |
||
| − | |<center>[[Gas Heaven]]</center> |
||
| − | [[File:IconMap Jnk GasStation.png|center|frameless|link=Gas Heaven]][[File:GasHeavenOutline.png|center|frameless|200px|link=Gas Heaven]] |
||
| − | |<center>[[Wretched Shop]]</center> |
||
| − | [[File:IconMap Jnk Garage.png|center|frameless|link=Wretched Shop]][[File:WretchedShopOutline.png|center|frameless|200px|link=Wretched Shop]] |
||
| − | |<center>[[Wreckers' Yard]]</center> |
||
| − | [[File:IconMap Jnk Scrapyard.png|center|frameless|link=Wreckers' Yard]][[File:WreckersYardOutline.png|center|frameless|200px|link=Wreckers' Yard]] |
||
| − | |} |
||
=== [[Coldwind Farm]] === |
=== [[Coldwind Farm]] === |
||
| + | {{#Invoke:Maps|assembleMapsForRealms|Coldwind Farm}} |
||
| − | {| class="wikitable" |
||
| − | |<center>[[Fractured Cowshed]]</center> |
||
| − | [[File:IconMap Frm Barn.png|center|frameless|link=Fractured Cowshed]][[File:FracturedCowshedOutline.png|center|frameless|200px|link=Fractured Cowshed]] |
||
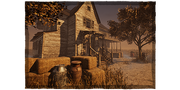
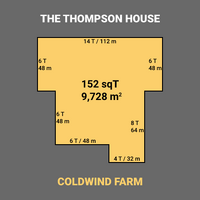
| − | |<center>[[The Thompson House]]</center> |
||
| − | [[File:IconMap Frm Farmhouse.png|center|frameless|link=The Thompson House]][[File:ThompsonHouseOutline.png|center|frameless|200px|link=The Thompson House]] |
||
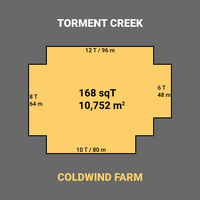
| − | |<center>[[Torment Creek]]</center> |
||
| − | [[File:IconMap Frm Silo.png|center|frameless|link=Torment Creek]][[File:TormentCreekOutline.png|center|frameless|200px|link=Torment Creek]] |
||
| − | |<center>[[Rancid Abattoir]]</center> |
||
| − | [[File:IconMap Frm Slaughterhouse.png|center|frameless|link=Rancid Abattoir]][[File:RancidAbattoirOutline.png|center|frameless|200px|link=Rancid Abattoir]] |
||
| − | |<center>[[Rotten Fields]]</center> |
||
| − | [[File:IconMap Frm Cornfield.png|center|frameless|link=Rotten Fields]][[File:RottenFieldsOutline.png|center|frameless|200px|link=Rotten Fields]] |
||
| − | |} |
||
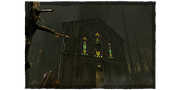
=== [[Crotus Prenn Asylum]] === |
=== [[Crotus Prenn Asylum]] === |
||
| + | {{#Invoke:Maps|assembleMapsForRealms|Crotus Prenn Asylum}} |
||
| − | {| class="wikitable" |
||
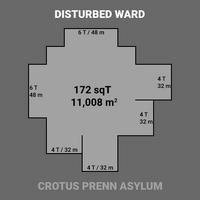
| − | |<center>[[Disturbed Ward]]</center> |
||
| − | [[File:IconMap Asy Asylum.png|center|frameless|link=Disturbed Ward]][[File:DisturbedWardOutline.png|center|frameless|200px|link=Disturbed Ward]] |
||
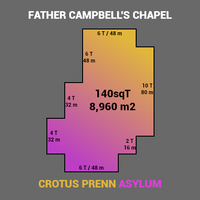
| − | |<center>[[Father Campbell's Chapel]]</center> |
||
| − | [[File:IconMap Asy Chapel.png|center|frameless|link=Father Campbell's Chapel]][[File:FatherCampbellsChapelOutline.png|center|frameless|200px|link=Father Campbell's Chapel]] |
||
| − | |} |
||
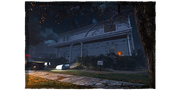
=== [[Haddonfield]] === |
=== [[Haddonfield]] === |
||
| + | {{#Invoke:Maps|assembleMapsForRealms|Haddonfield}} |
||
| − | {| class="wikitable" |
||
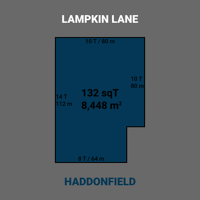
| − | |<center>[[Lampkin Lane]]</center> |
||
| − | [[File:IconMap Sub Street.png|center|frameless|link=Lampkin Lane]][[File:LampkinLaneOutline.png|center|frameless|200px|link=Lampkin Lane]] |
||
| − | |} |
||
=== [[Backwater Swamp]] === |
=== [[Backwater Swamp]] === |
||
| + | {{#Invoke:Maps|assembleMapsForRealms|Backwater Swamp}} |
||
| − | {| class="wikitable" |
||
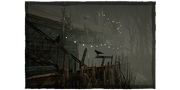
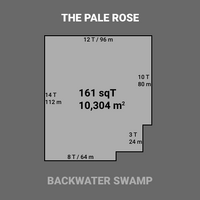
| − | |<center>[[The Pale Rose]]</center> |
||
| − | [[File:IconMap Swp PaleRose.png|center|frameless|link=The Pale Rose]][[File:PaleRoseOutline.png|center|frameless|200px|link=The Pale Rose]] |
||
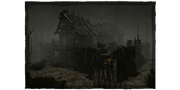
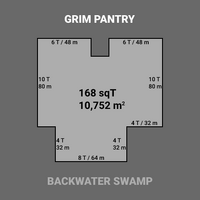
| − | |<center>[[Grim Pantry]]</center> |
||
| − | [[File:IconMap Swp GrimPantry.png|center|frameless|link=Grim Pantry]][[File:GrimPantryOutline.png|center|frameless|200px|link=Grim Pantry]] |
||
| − | |} |
||
=== [[Léry's Memorial Institute]] === |
=== [[Léry's Memorial Institute]] === |
||
| + | {{#Invoke:Maps|assembleMapsForRealms|Léry's Memorial Institute}} |
||
| − | {| class="wikitable" |
||
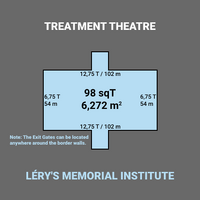
| − | |<center>[[Treatment Theatre]]</center> |
||
| − | [[File:IconMap Hos Treatment.png|center|frameless|link=Treatment Theatre]][[File:TreatmentTheatreOutline.png|center|frameless|200px|link=Treatment Theatre]] |
||
| − | |} |
||
=== [[Red Forest]] === |
=== [[Red Forest]] === |
||
| + | {{#Invoke:Maps|assembleMapsForRealms|Red Forest}} |
||
| − | {| class="wikitable" |
||
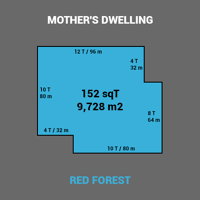
| − | |<center>[[Mother's Dwelling]]</center> |
||
| − | [[File:IconMap Brl MaHouse.png|center|frameless|link=Mother's Dwelling]][[File:MothersDwellingOutline.png|center|frameless|200px|link=Mother's Dwelling]] |
||
| − | |<center>[[The Temple of Purgation]]</center> |
||
| − | [[File:IconMap Brl Temple.png|center|frameless|link=The Temple of Purgation]][[File:TheTempleOfPurgationOutline.png|center|frameless|200px|link=The Temple of Purgation]] |
||
| − | |} |
||
===[[Springwood]]=== |
===[[Springwood]]=== |
||
| + | {{#Invoke:Maps|assembleMapsForRealms|Springwood}} |
||
| − | {| class="wikitable" |
||
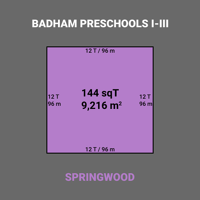
| − | |<center>[[Badham Preschool I]]</center> |
||
| − | [[File:IconMap Eng ElmStreet.png|center|frameless|link=Badham Preschool I]][[File:BadhamPreschoolOutline.png|center|frameless|200px|link=Badham Preschool I]] |
||
| − | |<center>[[Badham Preschool II]]</center> |
||
| − | [[File:IconMap Eng ElmStreet02.png|center|frameless|link=Badham Preschool II]][[File:BadhamPreschoolOutline.png|center|frameless|200px|link=Badham Preschool II]] |
||
| − | |<center>[[Badham Preschool III]]</center> |
||
| − | [[File:IconMap Eng ElmStreet03.png|center|frameless|link=Badham Preschool III]][[File:BadhamPreschoolOutline.png|center|frameless|200px|link=Badham Preschool III]] |
||
| − | |<center>[[Badham Preschool IV]]</center> |
||
| − | [[File:IconMap Eng ElmStreet04.png|center|frameless|link=Badham Preschool IV]][[File:BadhamPreschoolOutline.png|center|frameless|200px|link=Badham Preschool IV]] |
||
| − | |<center>[[Badham Preschool V]]</center> |
||
| − | [[File:IconMap Eng ElmStreet05.png|center|frameless|link=Badham Preschool V]][[File:BadhamPreschoolOutline.png|center|frameless|200px|link=Badham Preschool V]] |
||
| − | |} |
||
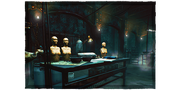
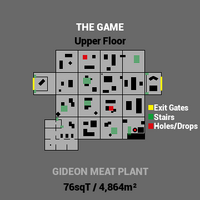
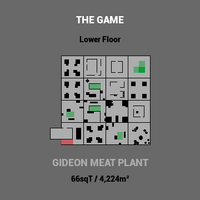
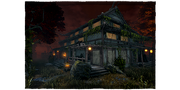
=== [[Gideon Meat Plant]] === |
=== [[Gideon Meat Plant]] === |
||
| + | {{#Invoke:Maps|assembleMapsForRealms|Gideon Meat Plant}} |
||
| − | {| class="wikitable" |
||
| − | |<center>[[The Game]]</center> |
||
| − | [[File:IconMap Fin TheGame.png|center|frameless|link=The Game]][[File:TheGameOutline_UpperFloor.png|center|frameless|200px|link=The Game]][[File:TheGameOutline_LowerFloor.png|center|frameless|200px|link=The Game]] |
||
| − | |} |
||
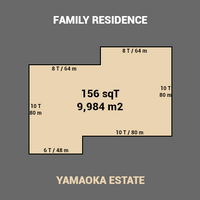
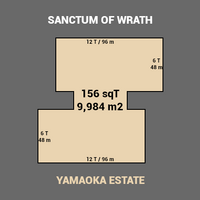
=== [[Yamaoka Estate]] === |
=== [[Yamaoka Estate]] === |
||
| + | {{#Invoke:Maps|assembleMapsForRealms|Yamaoka Estate}} |
||
| − | {| class="wikitable" |
||
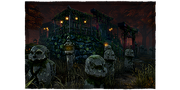
| − | |<center>[[Family Residence]]</center> |
||
| − | [[File:IconMap Hti Manor.png|center|frameless|link=Family Residence]][[File:FamilyResidenceOutline.png|center|frameless|200px|link=Family Residence]] |
||
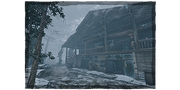
| − | |<center>[[Sanctum of Wrath]]</center> |
||
| − | [[File:IconMap Hti Shrine.png|center|frameless|link=Sanctum of Wrath]][[File:SanctumOfWrathOutline.png|center|frameless|200px|link=Sanctum of Wrath]] |
||
| − | |} |
||
=== [[Ormond]] === |
=== [[Ormond]] === |
||
| + | {{#Invoke:Maps|assembleMapsForRealms|Ormond}} |
||
| − | {| class="wikitable" |
||
| − | |<center>[[Mount Ormond Resort]]</center> |
||
| − | [[File:IconMap Kny Cottage.png|center|frameless|link=Mount Ormond Resort]][[File:MountOrmondResortOutline.png|center|frameless|200px|link=Mount Ormond Resort]] |
||
| − | |} |
||
=== [[Hawkins National Laboratory]] === |
=== [[Hawkins National Laboratory]] === |
||
| + | {{#Invoke:Maps|assembleMapsForRealms|Hawkins National Laboratory}} |
||
| − | {| class="wikitable" |
||
| − | |<center>[[The Underground Complex]]</center> |
||
| − | [[File:IconMap Qat Lab.png|center|frameless|link=The Underground Complex]][[File:TheUndergroundComplexOutline.png|center|frameless|200px|link=The Underground Complex]] |
||
| − | |} |
||
=== [[Grave of Glenvale]] === |
=== [[Grave of Glenvale]] === |
||
| + | {{#Invoke:Maps|assembleMapsForRealms|Grave of Glenvale}} |
||
| − | {| class="wikitable" |
||
| + | |||
| − | |<center>[[Dead Dawg Saloon]]</center> |
||
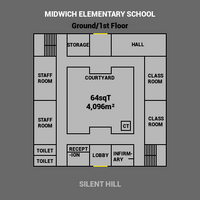
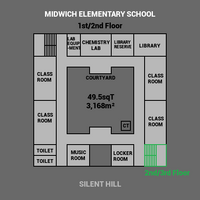
| + | === [[Silent Hill (Realm)|Silent Hill]] === |
||
| − | [[File:IconMap Ukr Saloon.png|center|frameless|link=The Underground Complex]][[File:DeadDawgSaloonOutline.png|center|frameless|200px|link=The Underground Complex]] |
||
| + | {{#Invoke:Maps|assembleMapsForRealms|Silent Hill}} |
||
| − | |} |
||
=== Recurring Locations === |
=== Recurring Locations === |
||
| Line 159: | Line 79: | ||
* [[Upside Down]] |
* [[Upside Down]] |
||
| ⚫ | |||
| − | {{Maps}} |
||
| ⚫ | |||
| + | Over the course of ''Dead by Daylight's'' existence, several either unreleased or unused Maps have been found in the Game files.<br>It is not known whether they will be released at some point or be removed from the code eventually. |
||
| + | Maps listed in '''{{clr|14|gold}}''' can (still) be found in the Game code, Maps in '''{{clr|15|fuchsia}}''' have been removed over time.<br>Their names are generally WIP names of Maps and a Map's actual name upon release would likely be different: |
||
| ⚫ | |||
| ⚫ | |||
| − | There are currently at least '''{{clr|8|5}}''' unreleased Maps belonging to several Realms, that can be found in the Game files: |
||
| + | ** '''{{clr|14|Mini}}''' |
||
| ⚫ | |||
| − | * Seb's Dream |
+ | ** '''{{clr|14|Seb's Dream}}''' |
| − | * |
+ | * Crotus Prenn Asylum |
| + | ** '''{{clr|15|Infinite Gym}}''' |
||
| ⚫ | |||
| + | * Haddonfield |
||
| − | * Grim Gully (Backwater Swamp) |
||
| + | ** '''{{clr|15|Facility}}''' |
||
| ⚫ | |||
| + | ** '''{{clr|15|Dead Lake}}''' |
||
| + | ** '''{{clr|15|Grim Gully}}''' |
||
| + | ** '''{{clr|14|Mound}}''' |
||
| + | * Ormond |
||
| + | ** '''{{clr|14|Shack}}''' |
||
| − | == |
+ | == Tile Sizes == |
* The square Tiles used for measuring reference are actually 8x8 sub-tiles, making up the larger tile assets used to construct the Maps with. |
* The square Tiles used for measuring reference are actually 8x8 sub-tiles, making up the larger tile assets used to construct the Maps with. |
||
** The Game uses 3 combinations of (Master) Tiles: 16x16, 16x32 or 32x32 metres / 4, 8 or 16 squared Tiles. |
** The Game uses 3 combinations of (Master) Tiles: 16x16, 16x32 or 32x32 metres / 4, 8 or 16 squared Tiles. |
||
* Even though each Map's Tiles change their orientation and sometimes their location from trial to trial, the outer walls and thus the Map's size remain the same. |
* Even though each Map's Tiles change their orientation and sometimes their location from trial to trial, the outer walls and thus the Map's size remain the same. |
||
| + | |||
| ⚫ | |||
| + | {{#Invoke:Maps|assembleSortedMapsTableBySize}} |
||
== Trivia == |
== Trivia == |
||
| − | * The average Map has a size of '''{{clr| |
+ | * The average Map has a size of '''{{clr|2|{{#Invoke:Maps|getAverageMapSize}} square Tiles}}''' or '''{{clr|purple|{{#Invoke:Maps|getAverageMapSize|true}} m<sup>2</sup>}}'''. |
** The outer walls are composed of single and double wall segments with a length of 8 metres for the single and 16 metres for the double segments. |
** The outer walls are composed of single and double wall segments with a length of 8 metres for the single and 16 metres for the double segments. |
||
| − | ** This allows a calculation of a Map's size, with [[ |
+ | ** This allows a calculation of a Map's size, with [[{{#Invoke:Maps|getBiggestMap|true}}]] being the largest Map with '''{{clr|6|{{#Invoke:Maps|getBiggestMap}}}}''' and [[{{#Invoke:Maps|getSmallestMap|true}}]] being the smallest Map with '''{{clr|8|{{#Invoke:Maps|getSmallestMap}}}}''' square Tiles. |
| − | *** Even though [[The Underground Complex]] is technically the Map covering the smallest surface area, with its numerous catwalks its actual playable surface is considerably larger and |
+ | *** Even though [[The Underground Complex]] is technically the Map covering the smallest surface area, with its numerous catwalks its actual playable surface is considerably larger and is estimated to be in the neighbourhood of '''{{clr|4|~138}}''' square Tiles. |
Revision as of 00:03, 23 November 2020

|
I awoke to find myself in this strange place. I have no memory of how I came here. | ||
| ~ Benedict Baker |
|
Every place feels mysterious, yet is somehow the same. Every time I wake up I shiver with fear for what new nightmare awaits. Each departure from the campfire is into confusion. Slowly I learn the different places, recognising features and buildings but I never really understand the pattern. As if some powerful force is shuffling the world as if we were a deck of cards. Maybe we are just pawns on a scrabble board? | ||
| ~ Benedict Baker's Journal |
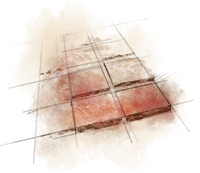
Benedict Baker's depiction of the Procedural.
The Realms are semi-procedural locations within the World of The Template:IconLink. Each Realm was the site of a violent tragedy in the past and they now serve as the Arenas for The Entity's trials.
Overview
The location of the trial is chosen by The Entity. Players can influence The Entity's choice by burning certain Template:IconLink.
Trial locations have certain fixed landmarks, but elements such as player starting locations, Template:IconLink, Template:IconLink Template:IconLink, Template:IconLink and Template:IconLink are placed to The Entity's whims. Even the terrain itself shifts from trial to trial.
There are currently 20 Realms and 48 Maps featured in Template:IconLink.
Lore
The Realms are pockets within The Entity, who constructs everything from itself except for the Killers and the Survivors. The Realms do not co-exist at all times, but are rather created whenever needed. The location of The Campfire is also located within such a pocket. The Woods and Fog beyond the Trial grounds represent the boundaries of the pocket and are just a façade.
Realms & Maps
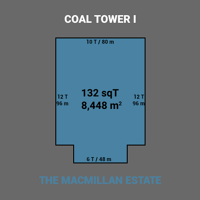
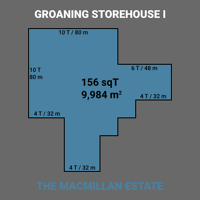
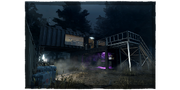
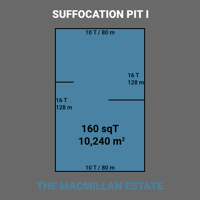
The MacMillan Estate
   |
   |
   |
   |
   |
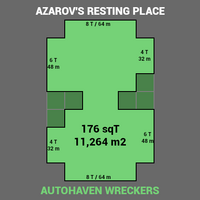
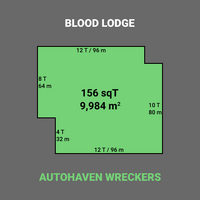
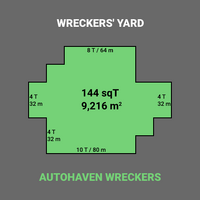
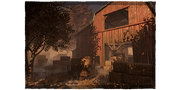
Autohaven Wreckers
  |
  |
  |
  |
  |
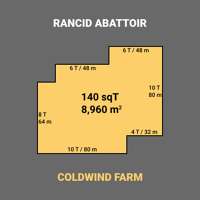
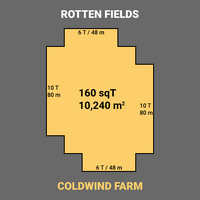
Coldwind Farm
  |
  |
  |
  |
  |
Crotus Prenn Asylum
  |
  |
Haddonfield
  |
Backwater Swamp
  |
  |
Léry's Memorial Institute
  |
Red Forest
  |
  |
Springwood
    |
Gideon Meat Plant
   |
Yamaoka Estate
  |
  |
Ormond
  |
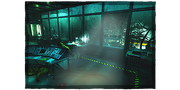
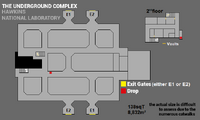
Hawkins National Laboratory
  |
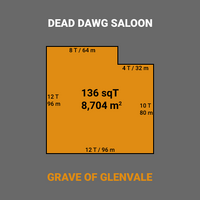
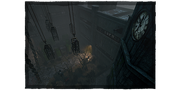
Grave of Glenvale
  |
Silent Hill
   |
Recurring Locations
Basement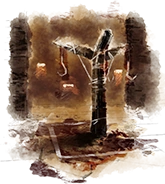 |
Killer Shack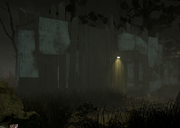 |
Sub-Realms
Sub-Realms are usually different planes of existence within the Realm of The Entity. There are currently 8 known Sub-Realms:
Other Maps
Over the course of Dead by Daylight's existence, several either unreleased or unused Maps have been found in the Game files.
It is not known whether they will be released at some point or be removed from the code eventually.
Maps listed in gold can (still) be found in the Game code, Maps in fuchsia have been removed over time.
Their names are generally WIP names of Maps and a Map's actual name upon release would likely be different:
- The MacMillan Estate
- Mini
- Seb's Dream
- Crotus Prenn Asylum
- Infinite Gym
- Haddonfield
- Facility
- Backwater Swamp
- Dead Lake
- Grim Gully
- Mound
- Ormond
- Shack
Tile Sizes
- The square Tiles used for measuring reference are actually 8x8 sub-tiles, making up the larger tile assets used to construct the Maps with.
- The Game uses 3 combinations of (Master) Tiles: 16x16, 16x32 or 32x32 metres / 4, 8 or 16 squared Tiles.
- Even though each Map's Tiles change their orientation and sometimes their location from trial to trial, the outer walls and thus the Map's size remain the same.
Map Sizes
| Rank | Map | Size (sqT, 8x8 m2) | Size (m2) |
|---|---|---|---|
| 1 | Shelter Woods I | 176 | 11,264 |
| Shelter Woods II | |||
| Azarov's Resting Place | |||
| 2 | Disturbed Ward | 172 | 11,008 |
| 3 | Torment Creek | 168 | 10,752 |
| Grim Pantry | |||
| 4 | Wretched Shop | 164 | 10,496 |
| Garden of Joy | |||
| 5 | The Pale Rose | 161 | 10,304 |
| 6 | Ironworks of Misery I | 160 | 10,240 |
| Suffocation Pit I | |||
| Rotten Fields | |||
| Greenville Square | |||
| 7 | Groaning Storehouse I | 156 | 9,984 |
| Ironworks of Misery II | |||
| Blood Lodge | |||
| Gas Heaven | |||
| Family Residence | |||
| Sanctum of Wrath | |||
| Mount Ormond Resort | |||
| 8 | Suffocation Pit II | 152 | 9,728 |
| Fractured Cowshed | |||
| The Thompson House | |||
| Mother's Dwelling | |||
| Nostromo Wreckage | |||
| 9 | Groaning Storehouse II | 148 | 9,472 |
| Badham Preschool V | |||
| Eyrie of Crows | |||
| 10 | Wreckers' Yard | 144 | 9,216 |
| Badham Preschool I | |||
| Badham Preschool II | |||
| Badham Preschool III | |||
| The Shattered Square | |||
| 11 | The Game | 142 | 9,088 |
| 12 | Rancid Abattoir | 140 | 8,960 |
| Father Campbell's Chapel | |||
| Badham Preschool IV | |||
| 13 | The Underground Complex | 138 | 8,832 |
| 14 | Coal Tower II | 136 | 8,704 |
| The Temple of Purgation | |||
| Dead Dawg Saloon | |||
| Toba Landing | |||
| 15 | Coal Tower I | 132 | 8,448 |
| Lampkin Lane | |||
| 16 | Midwich Elementary School | 113.5 | 7,264 |
| 17 | Treatment Theatre | 98 | 6,272 |
Trivia
- The average Map has a size of 144 square Tiles or 9201 m2.
- The outer walls are composed of single and double wall segments with a length of 8 metres for the single and 16 metres for the double segments.
- This allows a calculation of a Map's size, with Shelter Woods I being the largest Map with 176 and Treatment Theatre being the smallest Map with 98 square Tiles.
- Even though The Underground Complex is technically the Map covering the smallest surface area, with its numerous catwalks its actual playable surface is considerably larger and is estimated to be in the neighbourhood of ~138 square Tiles.