FichteHiro (discusión | contribs.) (→MacMillan Estate: No estaba traducido aún) Etiquetas: Edición desde móvil Edición vía web móvil |
Pokejoe0512 (discusión | contribs.) |
||
| (No se muestran 34 ediciones intermedias de 5 usuarios) | |||
| Línea 1: | Línea 1: | ||
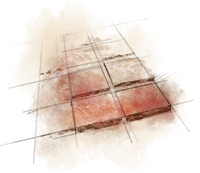
[[File:dbd-journal-procedural.png|framed|right|Benedict Baker's depiction of the Procedural.]] |
[[File:dbd-journal-procedural.png|framed|right|Benedict Baker's depiction of the Procedural.]] |
||
| − | Los '''{{PAGENAME}}''' son ubicaciones dentro del Mundo del {{IconLink|Ente|IconHelp|entity}}. |
+ | Los '''{{PAGENAME}}''' son ubicaciones dentro del Mundo del {{IconLink|Ente|IconHelp|entity}}. Cada Reino fue el sitio de una tragedia violenta en el pasado y ahora sirven como Arenas para los juicios del Ente. |
| − | + | La ubicación de la prueba es elegida por el Ente. Los jugadores pueden influir en la elección del Ente quemando ciertos{{IconLink|Ofrendas|IconHelp|offerings}}. |
|
Las ubicaciones de la prueba tienen ciertos elementos fijos, pero algunos elementos como los jugadores que comienzan ubicados, {{IconLink|Generadores}}, {{IconLink|Cofres}}, {{IconLink|Tótems}} y {{IconLink|Puertas de Salida}} están colocados conforme a los caprichos el Ente. Incluso el mismo terreno cambia de prueba a prueba. |
Las ubicaciones de la prueba tienen ciertos elementos fijos, pero algunos elementos como los jugadores que comienzan ubicados, {{IconLink|Generadores}}, {{IconLink|Cofres}}, {{IconLink|Tótems}} y {{IconLink|Puertas de Salida}} están colocados conforme a los caprichos el Ente. Incluso el mismo terreno cambia de prueba a prueba. |
||
| Línea 9: | Línea 9: | ||
Hay un total de '''{{clr|2|{{Nom}}}}''' Reinos y '''{{clr|6|{{MapNom}}}}''' Mapas disponibles en ''{{IconLink|Dead by Daylight}}''. |
Hay un total de '''{{clr|2|{{Nom}}}}''' Reinos y '''{{clr|6|{{MapNom}}}}''' Mapas disponibles en ''{{IconLink|Dead by Daylight}}''. |
||
| + | ==Reinos & Mapas== |
||
| − | |||
| ⚫ | |||
| − | ==Realms & Maps== |
||
| ⚫ | |||
{| class="wikitable" |
{| class="wikitable" |
||
| − | |<center>[[ |
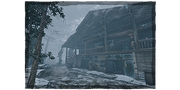
+ | |<center>[[Torre de Carbón]]</center> |
[[File:IconMap Ind CoalTower.png|center|frameless|link=Coal Tower]][[File:CoalTowerOutline.png|center|frameless|200px|link=Coal Tower]] |
[[File:IconMap Ind CoalTower.png|center|frameless|link=Coal Tower]][[File:CoalTowerOutline.png|center|frameless|200px|link=Coal Tower]] |
||
| − | |<center>[[ |
+ | |<center>[[Depósito Quejumbroso]]</center> |
[[File:IconMap Ind Storehouse.png|center|frameless|link=Groaning Storehouse]][[File:GroaningStorehouseOutline.png|center|frameless|200px|link=Groaning Storehouse]] |
[[File:IconMap Ind Storehouse.png|center|frameless|link=Groaning Storehouse]][[File:GroaningStorehouseOutline.png|center|frameless|200px|link=Groaning Storehouse]] |
||
| − | |<center>[[ |
+ | |<center>[[Fundición de la Miseria]]</center> |
[[File:IconMap Ind Foundry.png|center|frameless|link=Ironworks of Misery]][[File:IronworksOfMiseryOutline.png|center|frameless|200px|link=Ironworks of Misery]] |
[[File:IconMap Ind Foundry.png|center|frameless|link=Ironworks of Misery]][[File:IronworksOfMiseryOutline.png|center|frameless|200px|link=Ironworks of Misery]] |
||
| − | |<center>[[ |
+ | |<center>[[Bosque de la Guarida]]</center> |
[[File:IconMap Ind Forest.png|center|frameless|link=Shelter Woods]][[File:ShelterWoodsOutline.png|center|frameless|200px|link=Shelter Woods]] |
[[File:IconMap Ind Forest.png|center|frameless|link=Shelter Woods]][[File:ShelterWoodsOutline.png|center|frameless|200px|link=Shelter Woods]] |
||
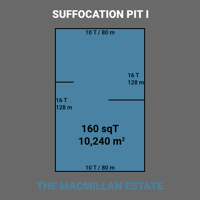
|<center>[[Pozo de Asfixia]]</center> |
|<center>[[Pozo de Asfixia]]</center> |
||
| Línea 25: | Línea 24: | ||
|} |
|} |
||
| − | ===[[ |
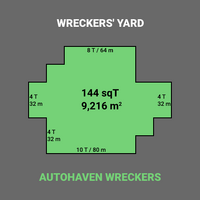
+ | ===[[Desguace Autohaven]]=== |
{| class="wikitable" |
{| class="wikitable" |
||
| − | |<center>[[ |
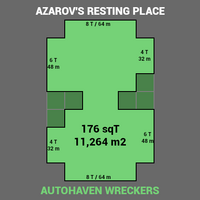
+ | |<center>[[Última Morada de Azarov]]</center> |
[[File:IconMap Jnk Office.png|center|frameless|link=Azarov's Resting Place]][[File:AzarovsRestingPlaceOutline.png|center|frameless|200px|link=Azarov's Resting Place]] |
[[File:IconMap Jnk Office.png|center|frameless|link=Azarov's Resting Place]][[File:AzarovsRestingPlaceOutline.png|center|frameless|200px|link=Azarov's Resting Place]] |
||
| − | |<center>[[ |
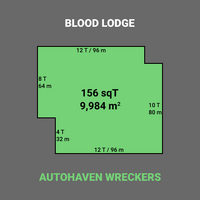
+ | |<center>[[Alojamiento Sangriento]]</center> |
[[File:IconMap Jnk Lodge.png|center|frameless|link=Blood Lodge]][[File:BloodLodgeOutline.png|center|frameless|200px|link=Blood Lodge]] |
[[File:IconMap Jnk Lodge.png|center|frameless|link=Blood Lodge]][[File:BloodLodgeOutline.png|center|frameless|200px|link=Blood Lodge]] |
||
| − | |<center>[[ |
+ | |<center>[[Gasolinera]]</center> |
[[File:IconMap Jnk GasStation.png|center|frameless|link=Gas Heaven]][[File:GasHeavenOutline.png|center|frameless|200px|link=Gas Heaven]] |
[[File:IconMap Jnk GasStation.png|center|frameless|link=Gas Heaven]][[File:GasHeavenOutline.png|center|frameless|200px|link=Gas Heaven]] |
||
| − | |<center>[[ |
+ | |<center>[[Taller Ruinoso]]</center> |
[[File:IconMap Jnk Garage.png|center|frameless|link=Wretched Shop]][[File:WretchedShopOutline.png|center|frameless|200px|link=Wretched Shop]] |
[[File:IconMap Jnk Garage.png|center|frameless|link=Wretched Shop]][[File:WretchedShopOutline.png|center|frameless|200px|link=Wretched Shop]] |
||
| − | |<center>[[ |
+ | |<center>[[Depósito de Desguace]]</center> |
[[File:IconMap Jnk Scrapyard.png|center|frameless|link=Wreckers' Yard]][[File:WreckersYardOutline.png|center|frameless|200px|link=Wreckers' Yard]] |
[[File:IconMap Jnk Scrapyard.png|center|frameless|link=Wreckers' Yard]][[File:WreckersYardOutline.png|center|frameless|200px|link=Wreckers' Yard]] |
||
|} |
|} |
||
| − | ===[[ |
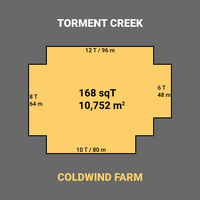
+ | ===[[Granja Coldwind]]=== |
{| class="wikitable" |
{| class="wikitable" |
||
| − | |<center>[[ |
+ | |<center>[[Establo]]</center> |
[[File:IconMap Frm Barn.png|center|frameless|link=Fractured Cowshed]][[File:FracturedCowshedOutline.png|center|frameless|200px|link=Fractured Cowshed]] |
[[File:IconMap Frm Barn.png|center|frameless|link=Fractured Cowshed]][[File:FracturedCowshedOutline.png|center|frameless|200px|link=Fractured Cowshed]] |
||
| − | |<center>[[ |
+ | |<center>[[La Casa de Thompson]]</center> |
[[File:IconMap Frm Farmhouse.png|center|frameless|link=The Thompson House]][[File:ThompsonHouseOutline.png|center|frameless|200px|link=The Thompson House]] |
[[File:IconMap Frm Farmhouse.png|center|frameless|link=The Thompson House]][[File:ThompsonHouseOutline.png|center|frameless|200px|link=The Thompson House]] |
||
| − | |<center>[[ |
+ | |<center>[[Arroyo del Tormento]]</center> |
[[File:IconMap Frm Silo.png|center|frameless|link=Torment Creek]][[File:TormentCreekOutline.png|center|frameless|200px|link=Torment Creek]] |
[[File:IconMap Frm Silo.png|center|frameless|link=Torment Creek]][[File:TormentCreekOutline.png|center|frameless|200px|link=Torment Creek]] |
||
| − | |<center>[[ |
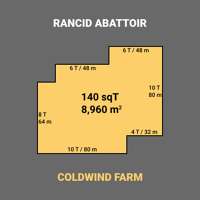
+ | |<center>[[Matadero Pestilente]]</center> |
[[File:IconMap Frm Slaughterhouse.png|center|frameless|link=Rancid Abattoir]][[File:RancidAbattoirOutline.png|center|frameless|200px|link=Rancid Abattoir]] |
[[File:IconMap Frm Slaughterhouse.png|center|frameless|link=Rancid Abattoir]][[File:RancidAbattoirOutline.png|center|frameless|200px|link=Rancid Abattoir]] |
||
| − | |<center>[[ |
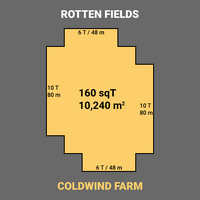
+ | |<center>[[Campos Podridos]]</center> |
[[File:IconMap Frm Cornfield.png|center|frameless|link=Rotten Fields]][[File:RottenFieldsOutline.png|center|frameless|200px|link=Rotten Fields]] |
[[File:IconMap Frm Cornfield.png|center|frameless|link=Rotten Fields]][[File:RottenFieldsOutline.png|center|frameless|200px|link=Rotten Fields]] |
||
|} |
|} |
||
| − | ===[[Crotus Prenn |
+ | ===[[Asilo Crotus Prenn]]=== |
{| class="wikitable" |
{| class="wikitable" |
||
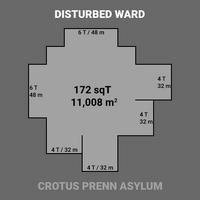
| − | |<center>[[ |
+ | |<center>[[Sala de Perturbados]]</center> |
[[File:IconMap Asy Asylum.png|center|frameless|link=Disturbed Ward]][[File:DisturbedWardOutline.png|center|frameless|200px|link=Disturbed Ward]] |
[[File:IconMap Asy Asylum.png|center|frameless|link=Disturbed Ward]][[File:DisturbedWardOutline.png|center|frameless|200px|link=Disturbed Ward]] |
||
| − | |<center>[[ |
+ | |<center>[[Capilla del Padre Campbell]]</center> |
[[File:IconMap Asy Chapel.png|center|frameless|link=Father Campbell's Chapel]][[File:FatherCampbellsChapelOutline.png|center|frameless|200px|link=Father Campbell's Chapel]] |
[[File:IconMap Asy Chapel.png|center|frameless|link=Father Campbell's Chapel]][[File:FatherCampbellsChapelOutline.png|center|frameless|200px|link=Father Campbell's Chapel]] |
||
|} |
|} |
||
| Línea 63: | Línea 62: | ||
===[[Haddonfield]]=== |
===[[Haddonfield]]=== |
||
{| class="wikitable" |
{| class="wikitable" |
||
| − | |<center>[[ |
+ | |<center>[[Calle Lampkin]]</center> |
[[File:IconMap Sub Street.png|center|frameless|link=Lampkin Lane]][[File:LampkinLaneOutline.png|center|frameless|200px|link=Lampkin Lane]] |
[[File:IconMap Sub Street.png|center|frameless|link=Lampkin Lane]][[File:LampkinLaneOutline.png|center|frameless|200px|link=Lampkin Lane]] |
||
|} |
|} |
||
| − | ===[[ |
+ | ===[[ Pantano de Aguas Estancadas]]=== |
{| class="wikitable" |
{| class="wikitable" |
||
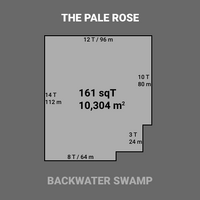
| − | |<center>[[ |
+ | |<center>[[El Pale Rose]]</center> |
[[File:IconMap Swp PaleRose.png|center|frameless|link=The Pale Rose]][[File:PaleRoseOutline.png|center|frameless|200px|link=The Pale Rose]] |
[[File:IconMap Swp PaleRose.png|center|frameless|link=The Pale Rose]][[File:PaleRoseOutline.png|center|frameless|200px|link=The Pale Rose]] |
||
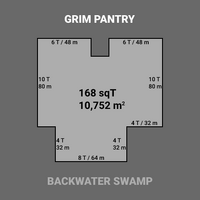
| − | |<center>[[ |
+ | |<center>[[Despensa Sombría]]</center> |
[[File:IconMap Swp GrimPantry.png|center|frameless|link=Grim Pantry]][[File:GrimPantryOutline.png|center|frameless|200px|link=Grim Pantry]] |
[[File:IconMap Swp GrimPantry.png|center|frameless|link=Grim Pantry]][[File:GrimPantryOutline.png|center|frameless|200px|link=Grim Pantry]] |
||
|} |
|} |
||
| − | ===[[ |
+ | ===[[Instituto Conmemorativo Léry]]=== |
{| class="wikitable" |
{| class="wikitable" |
||
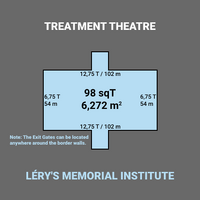
| − | |<center>[[ |
+ | |<center>[[Clínica Abandonada]]</center> |
[[File:IconMap Hos Treatment.png|center|frameless|link=Treatment Theatre]][[File:TreatmentTheatreOutline.png|center|frameless|200px|link=Treatment Theatre]] |
[[File:IconMap Hos Treatment.png|center|frameless|link=Treatment Theatre]][[File:TreatmentTheatreOutline.png|center|frameless|200px|link=Treatment Theatre]] |
||
|} |
|} |
||
| − | ===[[ |
+ | ===[[Bosque Rojo]]=== |
{| class="wikitable" |
{| class="wikitable" |
||
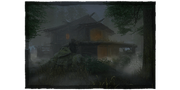
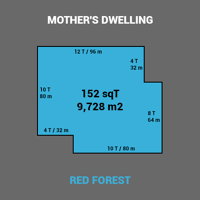
| − | |<center>[[ |
+ | |<center>[[Morada Maternal]]</center> |
[[File:IconMap Brl MaHouse.png|center|frameless|link=Mother's Dwelling]][[File:MothersDwellingOutline.png|center|frameless|200px|link=Mother's Dwelling]] |
[[File:IconMap Brl MaHouse.png|center|frameless|link=Mother's Dwelling]][[File:MothersDwellingOutline.png|center|frameless|200px|link=Mother's Dwelling]] |
||
|} |
|} |
||
| Línea 89: | Línea 88: | ||
===[[Springwood]]=== |
===[[Springwood]]=== |
||
{| class="wikitable" |
{| class="wikitable" |
||
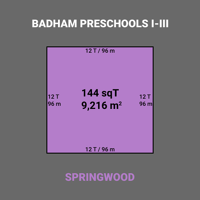
| − | |<center>[[ |
+ | |<center>[[Colegio Badham]]</center> |
[[File:IconMap Eng ElmStreet.png|center|frameless|link=Badham Preschool]][[File:BadhamPreschoolOutline.png|center|frameless|200px|link=Badham Preschool]] |
[[File:IconMap Eng ElmStreet.png|center|frameless|link=Badham Preschool]][[File:BadhamPreschoolOutline.png|center|frameless|200px|link=Badham Preschool]] |
||
|} |
|} |
||
| − | ===[[ |
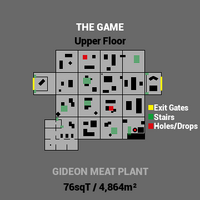
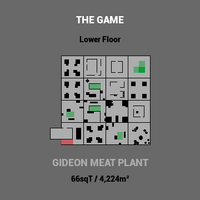
+ | ===[[Planta Procesadora de Carne Gideon]]=== |
{| class="wikitable" |
{| class="wikitable" |
||
|<center>[[El Juego]]</center> |
|<center>[[El Juego]]</center> |
||
| Línea 99: | Línea 98: | ||
|} |
|} |
||
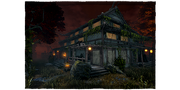
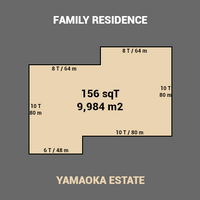
| + | ===[[Finca Yamaoka]]=== |
||
| + | {| class="wikitable" |
||
| + | |<center>[[Residencia Familiar]]</center> |
||
| + | [[File:IconMap Hti Manor.png|center|frameless|link=Family Residence]][[File:FamilyResidenceOutline.png|center|frameless|200px|link=Family Residence]] |
||
| + | |} |
||
| + | |||
| + | ===[[:en:Ormond|Ormond]]=== |
||
| + | {| class="wikitable" |
||
| + | |<center>[[:en:Mount_Ormond_Resort|Mount Ormond Resort]]</center>[[File:IconMap Kny Cottage.png|center|frameless|link=https://deadbydaylight.gamepedia.com/Mount_Ormond_Resort]][[File:MountOrmondResortOutline.png|center|frameless|200px|link=https://deadbydaylight.gamepedia.com/Mount_Ormond_Resort]] |
||
| + | |} |
||
===Localizaciones Recurrentes=== |
===Localizaciones Recurrentes=== |
||
{| class="wikitable" |
{| class="wikitable" |
||
| Línea 105: | Línea 114: | ||
|} |
|} |
||
| + | ==Clasificación de tamaño de los Mapas== |
||
| − | |||
| − | ==Map Size Ranking== |
||
{| class="wikitable" |
{| class="wikitable" |
||
|- |
|- |
||
| − | ! Rank !! |
+ | ! Rank !! Mapa !! Tamaño en ''square Tiles'' |
|- style="text-align:center" |
|- style="text-align:center" |
||
! 1 |
! 1 |
||
| − | | style="background:#adadad;color:black;" | |
+ | | style="background:#adadad;color:black;" | El Pale Rose |
| 215 |
| 215 |
||
|- style="text-align:center" |
|- style="text-align:center" |
||
! 2 |
! 2 |
||
| − | | style="background:#39b0d9;color:black;" | |
+ | | style="background:#39b0d9;color:black;" | Morada Maternal |
| 188 |
| 188 |
||
|- style="text-align:center" |
|- style="text-align:center" |
||
! 3 |
! 3 |
||
| − | | style="background:#adadad;color:black;" | |
+ | | style="background:#adadad;color:black;" | Despensa Sombría |
| 178 |
| 178 |
||
|- style="text-align:center" |
|- style="text-align:center" |
||
! rowspan="2"| 4 |
! rowspan="2"| 4 |
||
| − | | style="background:#fccf6b;color:black;" | |
+ | | style="background:#fccf6b;color:black;" | Campos Podridos |
| rowspan="2"| 176 |
| rowspan="2"| 176 |
||
|- style="text-align:center" |
|- style="text-align:center" |
||
| − | | style="background:#4982a2;color:black;" | |
+ | | style="background:#4982a2;color:black;" | Bosque de la Guarida |
|- style="text-align:center" |
|- style="text-align:center" |
||
! 5 |
! 5 |
||
| − | | style="background:#bfbfbf;color:black;" | |
+ | | style="background:#bfbfbf;color:black;" | Sala de Perturbados |
| 172 |
| 172 |
||
|- style="text-align:center" |
|- style="text-align:center" |
||
! rowspan="5"| 6 |
! rowspan="5"| 6 |
||
| − | | style="background:#75d277;color:black;" | |
+ | | style="background:#75d277;color:black;" | Última Morada de Azarov |
| rowspan="5"| 168 |
| rowspan="5"| 168 |
||
|- style="text-align:center" |
|- style="text-align:center" |
||
| − | | style="background:#75d277;color:black;" | |
+ | | style="background:#75d277;color:black;" | Alojamiento Sangriento |
|- style="text-align:center" |
|- style="text-align:center" |
||
| − | | style="background:#fccf6b;color:black;" | |
+ | | style="background:#fccf6b;color:black;" | Establo |
|- style="text-align:center" |
|- style="text-align:center" |
||
| − | | style="background:#033755;color:white;" | |
+ | | style="background:#033755;color:white;" | Calle Lampkin |
|- style="text-align:center" |
|- style="text-align:center" |
||
| − | | style="background:#fccf6b;color:black;" | |
+ | | style="background:#fccf6b;color:black;" | Arroyo del Tormento |
|- style="text-align:center" |
|- style="text-align:center" |
||
! rowspan="3"| 7 |
! rowspan="3"| 7 |
||
| − | | style="background:#75d277;color:black;" | |
+ | | style="background:#75d277;color:black;" | Gasolinera |
| rowspan="3"| 164 |
| rowspan="3"| 164 |
||
|- style="text-align:center" |
|- style="text-align:center" |
||
| − | | style="background:#75d277;color:black;" | |
+ | | style="background:#75d277;color:black;" | Depósito de Desguace |
|- style="text-align:center" |
|- style="text-align:center" |
||
| − | | style="background:#75d277;color:black;" | |
+ | | style="background:#75d277;color:black;" | Taller Ruinoso |
|- style="text-align:center" |
|- style="text-align:center" |
||
! rowspan="3"| 8 |
! rowspan="3"| 8 |
||
| − | | style="background:#4982a2;color:black;" | |
+ | | style="background:#4982a2;color:black;" | Fundición de la Miseria |
| rowspan="3"| 160 |
| rowspan="3"| 160 |
||
|- style="text-align:center" |
|- style="text-align:center" |
||
| − | | style="background:#4982a2;color:black;" | |
+ | | style="background:#4982a2;color:black;" | Pozo de Asfixia |
|- style="text-align:center" |
|- style="text-align:center" |
||
| − | | style="background:#fccf6b;color:black;" | |
+ | | style="background:#fccf6b;color:black;" | La Casa de Thompson |
|- style="text-align:center" |
|- style="text-align:center" |
||
! 9 |
! 9 |
||
| − | | style="background:#4982a2;color:black;" | |
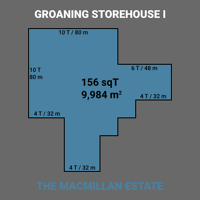
+ | | style="background:#4982a2;color:black;" | Depósito Quejumbroso |
| 156 |
| 156 |
||
|- style="text-align:center" |
|- style="text-align:center" |
||
! 10 |
! 10 |
||
| − | | style="background:#b47dca;color:black;" | |
+ | | style="background:#b47dca;color:black;" | Colegio Badham |
| 144 |
| 144 |
||
|- style="text-align:center" |
|- style="text-align:center" |
||
! 11 |
! 11 |
||
| − | | style="background:#ffffff;color:black;" | |
+ | | style="background:#ffffff;color:black;" | El Juego |
| 142 |
| 142 |
||
|- style="text-align:center" |
|- style="text-align:center" |
||
! 12 |
! 12 |
||
| − | | style="background:#bfbfbf;color:black;" | |
+ | | style="background:#bfbfbf;color:black;" | Capilla del Padre Campbell |
| 140 |
| 140 |
||
|- style="text-align:center" |
|- style="text-align:center" |
||
! 13 |
! 13 |
||
| − | | style="background:#fccf6b;color:black;" | |
+ | | style="background:#fccf6b;color:black;" | Matadero Pestilente |
| 136 |
| 136 |
||
|- style="text-align:center" |
|- style="text-align:center" |
||
! 14 |
! 14 |
||
| − | | style="background:#4982a2;color:black;" | |
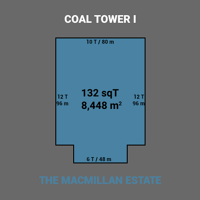
+ | | style="background:#4982a2;color:black;" | Torre de Carbón |
| 132 |
| 132 |
||
|- style="text-align:center" |
|- style="text-align:center" |
||
! 15 |
! 15 |
||
| − | | style="background:#b6ddf3;color:black;" | |
+ | | style="background:#b6ddf3;color:black;" | Clínica Abandonada |
| 116 |
| 116 |
||
|} |
|} |
||
==Mapas no Publicados== |
==Mapas no Publicados== |
||
| − | + | En este momento hay al menos '''{{clr|8|5}}''' mapas inéditos pertenecientes a varios reinos, que se pueden encontrar en los archivos del juego: |
|
* Mini (MacMillan Estate) |
* Mini (MacMillan Estate) |
||
* Seb's Dream (MacMillan Estate) |
* Seb's Dream (MacMillan Estate) |
||
Revisión actual - 16:34 7 mar 2019
Benedict Baker's depiction of the Procedural.
Los Reinos son ubicaciones dentro del Mundo del Ente ![]() . Cada Reino fue el sitio de una tragedia violenta en el pasado y ahora sirven como Arenas para los juicios del Ente.
. Cada Reino fue el sitio de una tragedia violenta en el pasado y ahora sirven como Arenas para los juicios del Ente.
La ubicación de la prueba es elegida por el Ente. Los jugadores pueden influir en la elección del Ente quemando ciertosOfrendas ![]() .
.
Las ubicaciones de la prueba tienen ciertos elementos fijos, pero algunos elementos como los jugadores que comienzan ubicados, Generadores ![]() , Cofres
, Cofres ![]() , Tótems
, Tótems ![]() y Puertas de Salida
y Puertas de Salida ![]() están colocados conforme a los caprichos el Ente. Incluso el mismo terreno cambia de prueba a prueba.
están colocados conforme a los caprichos el Ente. Incluso el mismo terreno cambia de prueba a prueba.
Hay un total de 12 Reinos y 24 Mapas disponibles en Dead by Daylight ![]() .
.
Reinos & Mapas[ | ]
Finca MacMillan[ | ]
  |
  |
  |
  |
  |
Desguace Autohaven[ | ]
  |
  |
  |
  |
  |
Granja Coldwind[ | ]
  |
 |
  |
  |
  |
Asilo Crotus Prenn[ | ]
  |
  |
Haddonfield[ | ]
  |
Pantano de Aguas Estancadas[ | ]
  |
  |
Instituto Conmemorativo Léry[ | ]
  |
Bosque Rojo[ | ]
  |
Springwood[ | ]
  |
Planta Procesadora de Carne Gideon[ | ]
   |
Finca Yamaoka[ | ]
  |
Ormond[ | ]
  |
Localizaciones Recurrentes[ | ]
Basement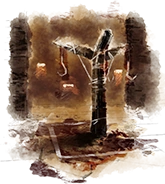 |
Killer Shack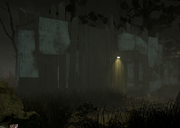 |
Clasificación de tamaño de los Mapas[ | ]
| Rank | Mapa | Tamaño en square Tiles |
|---|---|---|
| 1 | El Pale Rose | 215 |
| 2 | Morada Maternal | 188 |
| 3 | Despensa Sombría | 178 |
| 4 | Campos Podridos | 176 |
| Bosque de la Guarida | ||
| 5 | Sala de Perturbados | 172 |
| 6 | Última Morada de Azarov | 168 |
| Alojamiento Sangriento | ||
| Establo | ||
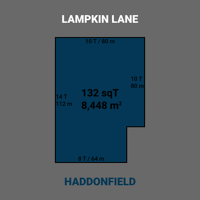
| Calle Lampkin | ||
| Arroyo del Tormento | ||
| 7 | Gasolinera | 164 |
| Depósito de Desguace | ||
| Taller Ruinoso | ||
| 8 | Fundición de la Miseria | 160 |
| Pozo de Asfixia | ||
| La Casa de Thompson | ||
| 9 | Depósito Quejumbroso | 156 |
| 10 | Colegio Badham | 144 |
| 11 | El Juego | 142 |
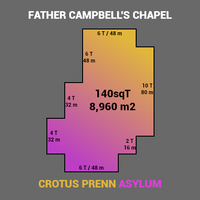
| 12 | Capilla del Padre Campbell | 140 |
| 13 | Matadero Pestilente | 136 |
| 14 | Torre de Carbón | 132 |
| 15 | Clínica Abandonada | 116 |
Mapas no Publicados[ | ]
En este momento hay al menos 5 mapas inéditos pertenecientes a varios reinos, que se pueden encontrar en los archivos del juego:
- Mini (MacMillan Estate)
- Seb's Dream (MacMillan Estate)
- Infinite Gym (Crotus Prenn Asylum)
- Dead Lake (Backwater Swamp)
- Grim Gully (Backwater Swamp)
Tiles[ | ]
- The square Tiles used for measuring reference are actually 8x8 sub-tiles, making up the larger tile assets used to construct the Maps with.
- The Game uses 3 combinations of (Master) Tiles: 16x16, 16x32 or 32x32 metres / 4, 8 or 16 squared Tiles.
- Even though each Map's Tiles change their orientation and sometimes their location from trial to trial, the outer walls and thus the Map's size remain the same.
Trivial[ | ]
- The average Map has a size of 160 square Tiles.
- The outer walls are composed of single and double wall segments with a length of 8 metres for the single and 16 metres for the double segments.
- This allows a calculation of a map's size, with Pale Rose being the largest Map with 215 and Treatment Theatre being the smallest Map with 116 square Tiles.
| Reinos & Mapas | |||||
|---|---|---|---|---|---|
| FINCA MACMILLAN | DESGUACE AUTOHAVEN | GRANJA COLDWIND | ASILO CROTUS PRENN | HADDONFIELD | PANTANO DE AGUAS ESTANCADAS |
| Torre de Carbón | Lugar de Descanso de Azarov | Establo | Sala de Perturbados | Calle Lampkin | El Pale Rose |
| Depósito Quejumbroso | Alojamiento Sangriento | Matadero Pestilente | Capilla del Padre Campbell | Despensa Sombría | |
| Fundición de la Miseria | Gasolinera | Campos Podridos | |||
| Bosque Refugio | Taller Ruinoso | La Casa de los Thompson | |||
| Pozo de Asfixia | Desguace | Arroyo del Tormento | |||
| INSTITUTO CONMEMORATIVO LÉRY | BOSQUE ROJO | SPRINGWOOD | PLANTA PROCESADORA DE CARNE GIDEON | FINCA YAMAOKA | ORMOND |
| Centro de Tratamiento | Morada Maternal | Colegio Badham | El Juego | Residencia Familiar | Complejo del Monte Ormond |
| Templo de Purgación | |||||
| Sub-Realms | |||||
| La Hoguera | El Mundo de los sueños | El Plano Etéreo | El Reino espiritual | El Vacío | |
| Recurring Locations | |||||
| El Sótano | La Cabaña del Asesino | ||||
| Unreleased Maps | |||||
| MACMILLAN ESTATE | CROTUS PRENN ASYLUM | BACKWATER SWAMP | |||
| Mini | Infinite Gym | Dead Lake | |||
| Seb's Dream | Grim Gully | ||||